A well-connected place

For a cabin in the woods, this place is pretty well connected.  Fiber internet works very well, and I have the fastest connection speeds I’ve ever had.  Service has been very reliable.

The HVAC guys finally got the phone app to connect to both HVAC units, and now I can control the heat/AC from my phone.  This will be very useful when I go out of town.  No need to keep the place cooled or heated when I’m not there, saving electricity.  Then when I’m on the way back I can set the temperature back to the normal values and when I get home it will be comfortable.

My garage door opener is also connected to wifi, and I can monitor the door’s position (open or closed) from a phone app.  I can also open or close the door from the phone app as well.  If something is blocking the door it won’t close, but I’ll know that and I can have someone stop by and clear the obstruction.  The important part is that I’ll know what’s going on with the door.

There are a couple of single-pole switches that control outside floodlights and I’m considering replacing those switches with wifi switches so that I can turn the lights on from my phone.  Not sure what brand to use, would be nice to find ones that I can control from a bash script.  That would allow me to set a schedule for the lights to be on and off, and still allow me to turn them on at any time from my phone via a simple web page.

I’m not sure what else I might link up, but I’m pretty satisfied with the way things are working now.  Coupled with the video security system, this place is humming along quite nicely now.

A few little add-ons

I’ve added a few things to the tractor to make it easier to use.  They’re not expensive, but they work well.

The first was to replace the small plastic toolbox with a larger one.  I picked up a surplus .50 caliber ammo box, and bolted it in the same place as the Kubota toolbox.  This one is larger, sealed at the lid, and holds the tools (pliers, adjustable wrenches, screwdrivers, etc) that are useful when using implements.  I added a small 3 pound hammer for convincing tight pins to go in or come out, as needed.  A few shop towels for wiping things clean, such as before using the grease gun on zerk fittings.  Also handy for wiping your hands after greasing.  It also hold extra pins and linchpins, and shear bolts for the bush hog PTO shaft.

The second was a short length of chain to hold the lower 3 point hitch lift arms in so they don’t swing outwards and hit the rear tires.  When not needed (while an implement is on the 3 point hitch) it clips up and out of the way.

I put a 2″ ball on the drawbar so that I can move trailers around with the tractor.  The 20′ flatbed trailer is heavy and not easily moved around but the tractor makes quick work of that.  In the future, I might drill a hole through the bucket so that a trailer ball can be installed for positioning trailers.  A nice feature of using the bucket is that you don’t need to move the tongue jack to set the trailer on the drawbar hitch, just drive under the hitch and lift.  The flatbed trailer uses a 2 5/16″ ball, but a 2″ ball fits all of my trailers and is fine for moving them around.

I’m considering adding a scabbard to carry a chain saw to the tractor so that it’s with me and I won’t need to make a trip back to the cabin to pick it up.  Especially handy when you’re out clearing brush and downed trees.  There are several types available, one that clamps around the loader post, and another that clamps onto the ROPS bar.  I haven’t decided which one yet, but it will be one of those two designs.  Either is better than just putting the chain saw into the loader bucket.  It’s too easy to forget it’s there and either load dirt or gravel on top of it, or accidentally dump it out and lose it or worse, run over it.  Neither of those are good for the saw.

I might add some LED work lighting to the back of the tractor, probably mounted on the ROPS bar.  That would help when unhitching an implement or working at dusk.  Sometimes you just want to finish up a job and you wind up needing another half hour or so after the sun goes down.

Maintenance items

If you recall, I added Pat’s Easy Change hitches to the lower lift arms on the 3 point hitch.  Without a doubt they make it quicker and easier to hitch and unhitch an implement.  But there is a potential issue that you should consider.

The Pat’s hitches move the attachment point about 4″ further from the tractor, so the amount you can lift goes down a bit.  It probably won’t be an issue for most of us, but for those that are wringing every bit of performance out of their tractor it could cause a problem.  Secondly, due to the 4″ extension to the left arms, the top link may now be too short to properly angle the implement.  Even if the top link is actually long enough, you may not have enough threads engaged in the body.  This will weaken the top link and could cause it to pull through.  My original top link body was 13 1/2″ long, so I decided to pick up a new, longer top link.  The body on the new one is 16″ long.  Not the full 4″ that the Pat’s hitches added to the lift arms, but is definitely longer and will have more threads engaged.

Going over the bush hog more carefully, several items need attention.  The original blades are in rough shape, mostly from striking objects while mowing.  The blades pivot when they strike an uncuttable object to prevent damage to the PTO shaft and gearbox, but the cutting edge takes the brunt of the strike.  They can be ground back to a serviceable cutting edge, but I chose to replace the blades.  They’re not overly expensive, and If I’m careful they will last a long time.  I borrowed a 3/4″ impact wrench from my cousin and that made quick work of replacing the blades.

The tailwheel yoke axle and spindle need greasing.  I removed the tailwheel yoke and checked it over.  The spindle is bent to the side a little, but the bigger worry is that the top part has worn down to 1 1/8″ from 1 1/4″.  I also decided to replace the yoke.  The wheel, hub, and axle are fine, just need a little cleanup and some fresh grease.

Once these items are finished, the bush hog will be ready to go for a long time, and periodic regreasing will keep it running smoothly.

My first implement purchase

I finally was able to track down the box blade I decided on at a Rural King store in Jeffersonville, Indiana.  I chose this one because of the weight and the way the top link frame was built and welded.  It is made by King Kutter and is 5 feet wide.  It’s painted red, but I’ll live with the color disparity.  The welds are good and the way the scarifiers are attached is very solid.  The cutting edges are reversible and replaceable as well.

The first chore was to unload it from the truck bed.  I have a good 3/8″ logging chain to use and my cousin is going to stop by to help mitigate the process so that I don’t bang it into the truck or do something else stupid while I’m unloading it.  He also has some pallets I can use to set it and the bush hog on so that I don’t have to set them on the ground.  The pallets will make it easier to hitch them up as well.

Unloaded the box blade using the loader and a chain.  Lifted it up and then drove the truck out from under it.  Set it down on the concrete and that’s done.  I did order 2 Bolt On grab hooks for the bucket.  That will make it a lot easier and safer to load/unload things from the truck bed.

Now to see how badly I can tear up the gravel driveway with the box blade.

Making changes to the tractor – now and down the road

Some changes are in order for the tractor, to make it easier to operate and hopefully faster at getting things done.

The first update was to add a bucket level indicator.  This add-on allows you to know if the bottom of the bucket is level or not.  This is a big help when moving dirt or gravel.  With experience, you recognize if the bucket is level by the way the top of the bucket looks from the seat, but this takes time to learn.  Using the bucket level indicator you can mostly eliminate the learning curve.  I chose the product from zookswelding.com and it fits and works perfectly.  It took longer to find my rachet than to install it.  A really nice add-on.

The next update was to install Pat’s Easy Change quick hitches onto the lower lift arms at the 3 point hitch.  They install fairly easily, but use the spacer bar to set the hitches the proper distance apart – which will depend on the implement you’re using.  You want the hitches to be parallel to each other when they are the proper distance apart.  It doesn’t have to be exact, but it will be easier and quicker to hitch and unhitch if they are properly aligned.  If your implement needs the PTO shaft, you’ll still have to climb off the tractor to hook that up, and most likely the top link as well.  There is a satisfying clunk when the hitches are secured on the lift pins.  So far, working just as expected.

The Kubota plastic toolbox behind the driver’s seat is handy, but doesn’t hold much.  I picked up a surplus .50 caliber ammo box and mounted it in place of the smaller plastic box.  It seals at the top, so I won’t have tools and pins and linchpins setting in water and rusting after the tractor is out in the rain.

To make it easier to use the loader to move heavy things around, I added a set of Bolt-On grab hooks to the bucket.  I placed them at the outer edges of the top rail of the bucket.  Now that I can left from two points instead of one, having the load swing around should be minimized, and lifting is safer as well.

Down the road:

I need a box blade so that I can properly maintain the driveway gravel.  It can be done with the loader, but it takes longer and is more difficult to get a nice smooth surface.  All things considered, box blades aren’t terribly expensive, so it will be a good implement to help maintain things at the cabin.

I want to have a rear remote hydraulic connection, so that I can use a hydraulic top link.  This makes angling a box blade much easier so that you can work more efficiently while leveling driveway gravel.  The third function valve that powers the rear remotes has a replacement knob for the loader joystick, with two button switches.  These switches control a solenoid in the valve that directs pressurized fluid flow to the rear remote, and the on to the hydraulic top link.  Each button moves the top link cylinder in opposite directions.

While I’m working on the hydraulics, I also want a front remote at the loader so that I can run a grapple or change the angle of a snow blade.  I plan to use a diverter valve on the output of the third function valve, to direct the pressurized fluid flow to either the front or rear remote as needed.  With the diverter valve I won’t be able to run both front and rear remotes at the same time, but I don’t foresee that being an issue.  With the right combination of quick couplers, the loader can still be easily removed from the tractor after installing the front remote.

I want to convert the pin-on loader bucket to use SSQA (skid steer quick attach) implements.  There is an adapter that fastens onto the loader using the same four pins that attached the pin-on bucket.  Then a plate that mates with the adapter is welded onto the bucket.  Some primer and Kubota orange paint and we’re good as new, except that now we can quickly swap loader implements such as a grapple. snow blade, or pallet forks.

I want to pick up a grapple as well.  They are really useful for clearing brush and general cleaning up and moving logs and tree limbs out of the way.  They’re not cheap, and that’s why it’s at the bottom of the list.  To run the grapple, the front remote is needed, and the SSQA needs to be installed on the loader.  So a couple of other upgrades need to be done before I’m ready for the grapple.

Lots of planned upgrades and I’ll do them as time and funds permit.  When I’m finished, I’ll have a very useful piece of equipment that can handle most any job around here.

Taking care of the place

The cabin is in the middle of 40 acres of woods, and taking care of it requires more than a push mower and a string trimmer.

So I’ve been looking for a compact tractor to do the heavy lifting (literally).  I found a Kubota L3301 with the LA525 loader and an RCR1260  5′ rotary cutter, on a 20′ flatbed trailer at a good price.  It doesn’t have a lot of hours and has been well maintained.  It’s a good tractor and the implements are a good start to keep the place well-maintained.

The first problem was that the tractor was in Calhoun, Georgia – more than 400 miles from here.  The second problem was that my little Dakota pickup isn’t up to the task of hauling 7,000 pounds of tractor and trailer up here.  My cousin Mitch offered to loan me one of his work trucks to go pick it up.  His one ton dually with a big diesel engine was easily up to the job, and I don’t think the truck even knew there was a trailer behind it.

It was a long drive down and back, but I did it in one day.  The big diesel just hummed along and did it’s job perfectly.  Zero problems going there or coming back.  You need to be a lot more aware of your position in the lane with a truck and trailer that wide, but I settled in and soon that was second nature.  The narrow country roads around here make that a larger problem, but I got back late so there wasn’t much traffic to contend with.

When I got back, I left the truck and trailer out front and called it a day.  The next morning, I undid the straps and backed the tractor off the trailer.  Then I had to figure out how to turn the whole rig around in a space that really wasn’t big enough.  I finally unhitched the trailer and pushed it back far enough to get the truck out, then pushed the trailer as far forward as I could.  Pushing and pulling a 20′ tandem flatbed trailer around by yourself is a lot of work – I guess there’s a reason you move trailers like this with a truck (or a tractor).

I returned the borrowed truck after filling it with fuel and DEF, and brought my little Dakota back home.  After driving the big truck for more than 800 miles, I am definitely going to consider a Chevy/GMC with the big diesel engine when  I buy a new(er) truck.


Stay tuned…

Video security system – complete and operational

The video security system is now a “fully armed and operational battlestation.”

I installed the replacement camera in it’s final position on the west exterior wall, aimed it, and connected it to ZM.  My initial aiming of the camera was close enough to the correct position that I decided to leave it alone.

The camera is working properly with ambient light and with IR lighting.  I set up a detection zone and a preclusive zone to try and prevent false positives, but I had to move the preclusive zone around a bit to achieve the desired effect.  There may be more tweaks in the future, but for now it appears to be working well.

So the system is complete and is working very well.  I’ve defined several run states, which controls the camera modes (monitor, motion detection, or disabled) by simply changing the run state.  You can easily change the run state from the web UI, a cron entry, or from the zmNinja phone app.  Very convenient, and much simpler than changing the mode for every camera in the system manually.

I didn’t spend a lot of cash for this system, but I did invest time in configuring ZM to do what I wanted, and to install the cameras and wire them to the POE switch.  Coding a script to copy event files to Google Drive was a bit of a challenge, and it’s working.  The system is secure, and the cameras are not accessible from outside my network.

An interesting journey from zero experience to a fully functional video security system.  Lots of people that I don’t know and will probably never meet shared their experience and knowledge on multiple forums, and ultimately helped me to get this system working.

My sincere thanks to the ZoneMinder authors and contributors, and to the people that post both questions and answers on the forums.  I learned a lot.

Video security system – firing on all cylinders

I received the replacement camera from Amcrest, fairly promptly if I’m honest about it.  I plugged it into the POE switch with a patch cable, and configured the network settings, including dedicated IP address, netmask, gateway IP address which you will recall is a valid IP address but not a gateway.  I configured the video feed parameters and turned off the overlays.

I went to the ZM console and activated the camera in monitor mode.  The camera worked fine and provided a good image with ambient light.  That night, I had a good image as well, with the IR emitters on the camera providing the lighting.  Success!

I ordered the exterior mount I need for this camera, and it arrived a few days later.  I’ll get the camera installed on the exterior wall, aimed, and then I’ll set up the detection zones.  I’ll use a preclusive zone to try and prevent a false positive when the camera switches to and from IR lighting, just like I did with the other exterior camera.

Then I will have a fully functional system, with two exterior cameras and two interior cameras, all with motion detection zones defined for the areas where there should not be motion – or to put it differently, areas where motion is something I want to know about.

The zmNinja phone app works very well, and I did some additional setup on the ZM console to make it easier to use.  You can configure the system as you want it to work when you’re away from the house, and you can save this run state as “Away”.  On the zmNinja phone app, you can change the run state to away with a couple of clicks (touches?) and all cameras will switch to modect.  I also set all cameras to monitor mode, and saved that run state as “Home”.  So when I pull in the driveway, before I get in range of the cameras, I can change the run state to “Home” and I won’t have to clear out a bunch of alerts from me driving up to the house.  Very useful and simple to manage.

I will also set up an additional run state that I will name “Night”.  In this run state, both exterior cameras and the downstairs camera will be in modect mode, while the upstairs camera will be in monitor mode.  I don’t need an alert when I turn on a bedroom or bathroom light during the night.  I also set up a “Privacy” run state, where the interior cameras are disabled, but the exterior cameras are in modect mode.

it’s a good system, with alert files uploaded to google drive as soon as they’re recorded, emails are sent for alerts with at least 10 frames of motion, just about full control with the zmNinja phone app, and UPS battery backup for the ONT, router, and camera power.  There is a 5 port switch upstairs so that the computer running ZM has a wired connection.  The upstairs switch is on another UPS, so it will continue to run even if the mains power fails.  The laptop running ZM has an internal battery so it doesn’t need to be on the UPS.

Pretty sophisticated security for a cabin in the sticks, and without spending a lot of cash to get there.  It took some thought and work to get the system where it is now, but hopefully documenting the process will help others figure out what they need and how to get it in place.

Happy video security to you!

Video security system – a problem resolved, but tweaks needed

Remember the upstairs camera that did not provide a good image after dark?  My initial suspicion was that the IR emitters had failed, but that turned out not to be the case.  The IR emitters were working fine, the problem is that the camera did not respond to IR lighting.  The net effect is the same, an almost completely dark image that is useless for detecting motion.  I swapped in another camera, and the upstairs video after dark is now good and the camera is behaving properly.  One problem resolved.  The old camera goes back for a warranty replacement.

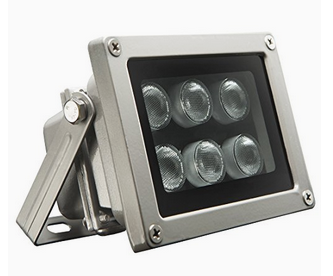
I installed an outdoor camera to monitor the driveway and the area in front of the garage door.  I think some supplemental IR lighting will be needed to have this camera work as well as I’d like, so I’ve ordered an IR floodlight and a power supply for it.  On my next trip up to the cabin I’ll play around with the IR floodlight and placement to see if I can improve the video image from the outdoor camera.  I’m hopeful that this supplemental lighting will also help with the yet-to-be installed camera on the west side of the cabin.

As expected, l ran into a little problem with the outdoor camera.  At dusk, the camera switches from daylight mode to IR, and in that transition period almost all of the pixels in the image change.  This large change triggers an alarm event.  Again, when the camera switches from IR mode to daylight, the changeover triggers yet another alarm event.

I didn’t want to reduce the sensitivity of the active zone, as that could prevent valid motion from triggering an alarm.  To resolve this, I created a small “preclusive” zone within the active motion detection zone.  It’s located up on the side of the building, where motion is unlikely.  The function of this zone is to prevent an alarm event when this zone changes.  Since preclusive zones are processed before active zones, this will stop alarm events during changes to and from IR and daylight modes.

I’ll continue to monitor the system and be sure that this zone is having the desired effect.  Since I can’t control the sunlight, I’ll just have to be patient and let nature proceed in it’s own way and on it’s own schedule while I test this change.

When I get the replacement camera back, I’ll get it installed and then my system will be complete.  So far, it’s working very well.  Not bad for someone who had zero experience with video security prior to this project.  I’ve learned a lot along the way and hopefully my experiences will help you.

4th annual Bourbon and Tobacco Tour of KY – postponed

The Bourbon and Tobacco Tour has been postponed to July 24-25, 2021.

Good pavement, nice gravel, light vehicle traffic, courteous drivers, and the hills of western Kentucky in the springtime – what’s not to like? Well, your legs might complain about some of the gradients, but the descents make it all worthwhile. And the riding companions – unparalleled.

A few updates for the COVID mess:

Rather than meeting at my house for dinner after the Saturday ride, we’ll just pick up dinner in Cadiz and meet at the park on the west side of town to eat and tell biking lies. My wife will be much happier with this, and there’s plenty of parking and tables for us. Because I don’t know what will transpire between now and the ride, please bring a mask and put it in your jersey pocket.

There are plenty of places to pick up some food – pizza at Casey’s, mexican at El Bracera, Sonic, Wendy’s, Taco Bell, KFC, Triplets, Cracker Barrel, and Subway. I’d rather have everyone at my house for a cookout, but I’m trying to make some adjustments that will work for everyone. I appreciate your understanding.

Friday dinner, July 23:

For those folks coming into town on Friday, we’ll meet at Triplett’s BBQ in Cadiz around 6pm for dinner. The restaurant is on US68/KY80 just west of I-24 at exit 65.

Saturday, July 24:

We will meet at 9:30am at the LBL Golden Pond Visitor Center on the Woodlands Trace Road, at the intersection of US-68/KY-80. There is plenty of parking at the visitor center. I will have some repair/adjustment tools, grease, chain lube, floor pump, work stand, and some spare tubes and patches. Hopefully no major repairs will be needed before, during, or after the ride but we’ll be prepared for the usual (and some of the unexpected). We’ll roll out from the parking area around 10am.

We will have a SAG driver again this year. It was a real luxury to have Greg volunteer his time and gas to follow us around in LBL, and he’s planning to join us again.

There is no cost for these rides, but if you wanted to kick in a few dollars for our SAG driver’s gas or a bite to eat for him I’m sure he would appreciate it.

The route:

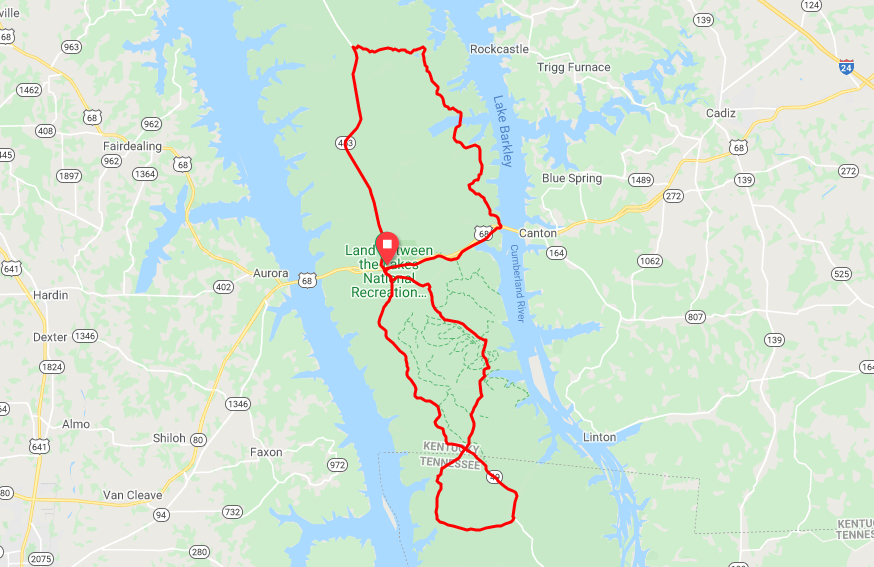
The route is the same as the 2020 ride, and is entirely within the LBL. This loop starts and ends at the Golden Pond Visitor Center in LBL, and is about 56 miles, all paved, with about 3500 feet of climbing. There are a small number of actual turns in this route, so hopefully there won’t be any issues with navigation or getting lost. I will give my cell number to riders, should assistance be needed during the ride. Cell coverage isn’t always the best in LBL, so bear that in mind. This is an unsupported ride, but we will do our best to help everyone finish up safely.


Click to Download Cue Sheet for the full route

Click to Download Cue Sheet for the partial route

Other cool stuff to do:

If you want to come in a day early, or stay over for a day or two, you could follow the Kentucky Bourbon Trail. If you like bourbon and want to sample the offerings by several distilleries, this is a great way to do it. Check out where the distilleries are located and plan your route.

You can drive north on the Trace Road, and drive through the Elk and Bison Sanctuary. There’s a small fee at the entrance to the sanctuary, and it’s well worth it. I’ve been there more than once and it’s a unique opportunity to see herds of bison and elk moving around the area. You do have to be in a vehicle – a bicycle vs a 2000 pound bison – no thanks.

There is a trap range close to the Lake Barkley Lodge, so if folks are interested we can shoot some clay targets. No prizes, just bragging rights. I have shotguns, ammunition, and clay targets – so all you’ll need is hearing and eye protection. If you’ve not done this before, it’s challenging and fun. If you’re new to this, I’ll be happy to help you shoot safely.

Post-ride cookout:

See the COVID notes above for Saturday dinner plans.

Sunday, July 25 – ride the trails:

If folks are interested, we’ll take some fatter-tired bikes out for some trail riding on Sunday. There’s a lot to choose from, the map links below will give you an idea of the variety available to us. A good choice is the Hardwoods Trail, from east to west all the way to Kentucky Lake. Mostly crushed limestone and a lot of fun. I would rate this trail as easy/moderate. Bikes with road tires won’t be the best choice for this – wider tires are the best way to go.

A local friend and riding buddy will lead the gravel ride on Sunday, he knows the gravel routes in LBL much better than I do.

At the north end of the LBL, there is a good singletrack loop named the Canal Loop. I would rate this loop as moderate/difficult.

There is a fairly new option, the trails in Livingston County, to the north of LBL. I’ve ridden there a few times and it’s a lot of fun. These trails are rated intermediate/difficult, so bring your “A” game. Be advised, you will want some tread on your tires for these trails.

We’ll figure out when and where to meet during the cookout and I’ll update the information here.

LBL Hike and Bike Trails

LBL Maps – click the Trails tab.

Livingston County MTB Trails

There are 500 miles of trails and 200 miles of roads in LBL. It is great to have this area so close to home. Not all of the trails are available for bicycling, so check the website while you scout a potential route.


Temperatures to expect:

The average high temperature in July is in the mid-to-upper 80s, and a low average in the upper 60s, so warm but still pretty good riding weather.

Lodging:

Here are some options for lodging and some suggestions for restaurants in the area.

Kenlake State Resort Park Reservations – this is a good choice if you want to ride to the start

Lake Barkley Lodge reservations – there is now a bike path paralleling us-68/KY-80 to the west so it’s a good ride to the start

Both are reasonably priced and are just a few minutes from our starting place. Kenlake and Lake Barkley both have restaurants too. For those folks arriving on Friday, we’ll meet for dinner.

Red Roof Inn – Cadiz – this is about a 15-20 minute drive to the start

Quality Inn – Cadiz – this is about a 15-20 minute drive to the start

Both of these hotels are at I-24 exit 65, and are within walking distance of Triplets. Driving time to the start point is 20-30 minutes.

Bike Shop:

Bikes and Moore in Hopkinsville is a great shop that I’m happy to call “home”. I couldn’t find a complaint if I tried. Good folks and they’ll be happy to help you out, should you need more than a tweak or two. They have knowledgeable mechanics and a good parts inventory too if it comes to that.

Questions:

Contact me if you have any questions, I’ll do my best to help.

Please watch your speed while driving in LBL, it’s federal land, so speeding tickets are expensive – paraphrasing Agent K – “the rangers do not have a sense of humor they’re aware of.”